Use cases
Here is a list of most common use cases that may occur while using reWASD. A question is in the title, and the answer is below. The numbers are not connected to the topics, and they don’t have any relations to the content of use cases. The answer contains general recommendations, and if they did not help — you need to contact support via one of the channels mentioned at the end of the page.
If you’re on this page because of your curiosity, you can perform the search on page via your browser (F3 or Ctrl+F) to ease the process!
1. I want to activate my license on another PC / I’ve reinstalled Windows, and I want to activate my license
You need to Revoke the license first. Then you can re-use the serial number.
2. Autoremap doesn’t work, even though Background Agent and Restore remap state... settings are enabled in reWASD
Please open Startup options. For Windows 10 you need to open Task Manager (Ctrl+Shift+Esc), and choose Startup. For Windows 7, press Win+r, enter msconfig and press Enter, then open Startup tab. See if reWASD status is Enabled, and change it if it’s disabled.
3. I can’t add Steam games to Autodetect if I choose the Shortcuts from Desktop
Find the *.exe file for a certain game. The default path for Steam games is C:\Program Files\Steam\steamapps\%Game%. To copy the precise path, right-click the shortcut on Desktop, and choose Open file location. Click on the Address bar and copy the path, then paste it in Autodetect window and proceed to the needed folder.
4. The game has multiple *.exe files, which one do I add to Autodetect?
You can assign multiple *.exe files to one config. If you want to choose the exact file, open Task Manager (press Ctrl+Shift+Esc), launch the game, find the process that corresponds to the game you opened. Right-click it and pick Open file location, the needed *.exe file will be chosen.
5. I have assigned a shortcut, but the keys that activate the shortcut reproduce as well
In the later reWASD versions, Shortcut participants do not reproduce when you trigger the shortcut. Make sure to use the latest reWASD version available. If the latest version is already installed, increase Shortcut Press time a bit.
If you need to use an older reWASD version: let’s say you have made a shortcut of A and B controller buttons, and assigned the Right Stick click to it. When you press both A and B, A or B (or both) reproduces together with Right Stick click. To make it work normally, mute the buttons that participate in a shortcut (A and B, in this case) and add reWASD mapping to the buttons that participate in a shortcut that correspond to the buttons (A to A, B to B).
6. One of my controller buttons is broken, how do I assign the broken key to controller (and save all other mappings)?
You can add a Shortcut or an Activator that will reproduce as the key that is missing. Find the needed mapping in the reWASD mapping drop-down list.
7. I want to make a 8-way D-pad
You can add the basic mappings to D-pad, then open Shortcuts menu, and create 4 Shortcuts for D-pad: up and right, right and down, down and left, left and up. And assign needed mappings to them. They will reproduce when the diagonal movements are performed.
8. I have WASD mapped to my stick and want to be able to run with it in game
Check what keyboard key is responsible for running in game, and add it to Stick High zone. Adjust the zone if needed.
9. I want the trigger to reach the maximum when I press is slightly
Open Trigger Zones menu, and move the right marker to the left. This will enlarge the right deadzone of a trigger.
10. I want to have different stick responses for different game modes
This is commonly used for running and aiming. You can set the button that is used for aiming as a Jump to Shift key, then open Shift 1, choose the stick for which you want to change the stick response and change it in Advanced settings. Thus, when you’re aiming, the stick response will be different.
11. I want to have different mouse or stick sensitivity for different game modes
This is commonly used for running and aiming. Set the global mouse sensitivity in Virtual device settings. Then open Shift 1, set the button that is used for aiming as a Jump to Shift key, then choose the stick you use for mouse movements, map mouse to it, then unclick Use global mouse sensitivity and change the level of sensitivity.
To change the stick sensitivity, set the needed Stick response or change the Stick settings for the main layer of mappings. Then open Shift 1, set the button that is used for aiming as a Jump to Shift key (usually, one of the triggers is used for it), then choose the stick you use for camera moves, and change the needed Stick response or Stick settings responsively. Thus, while you’re aiming, the sensitivity will be different.
12. I bought the license and now I want to activate it
To do that, open reWASD, then click the key icon in the lower-right corner to open License menu, click Activate, paste the serial number and activate it. Press Refresh the activation status to check the state of your license. Alternatively, close reWASD, go to C:\ProgramData\Disc-Soft\reWASD, and delete license.dat file. Re-open reWASD, and enter your serial number.
13. When I move the stick or press the trigger Esc (or another key) keeps reproducing
Usually this happens if you were in Stick advanced settings, and pressed Esc to go back to main (or another buttons may be pressed by accident). Since reWASD hooks the keyboard presses, Esc (or another key) may have hooked and mapped to Stick High Zone. To delete the mapping, open the Stick advanced settings, and remove the mappings you don’t need.
14. I want to Toggle a Turbo mapping
Create the keycombo that consists of a mapping and a pause (like as if you would create a Turbo mapping). Then go Back to main mappings and pick Toggle.
15. I want to prioritize vertical or horizontal axis on my D-pad
To prioritize the vertical axis (lessen the diagonal movements) open Shortcuts menu. Then add four shortcuts: D-pad up + D-pad right = D-pad up; D-pad up + D-pad left = D-pad up; D-pad down + D-pad right = D-pad down; D-pad down + D-pad left = D-pad down. Then go to Main mappings, mute D-pad, and reassign each of the 4 directions responsively.
If you use keyboard mappings on D-pad, you need to do the same thing, except the mapping of shortcuts must correspond the mapping of D-pad in main. Let's say you've mapped arrows in main to D-pad. Then, you need to add the following shortcuts to prioritize vertical: D-pad up + D-pad right = Up; D-pad up + D-pad left = Up; D-pad down + D-pad right = Down; D-pad down + D-pad left = Down. Also, the mute is not necessary for keyboard mappings, unless the game requires it.
16. I want to bind the application launch to the key press
To bind the app launch to a certain key press, you need to add a shortcut for the application launch. We suggest to do the following:
- First of all, find the needed *.exe file. You can launch the application, open Task Manager (Ctrl + Shift + Esc), find the needed process in Process tab, open its contextual menu and press Open file location. Note, that this option may be disabled for some system programs.
- Then, pick the *.exe file, open its contextual menu, pick Create shortcut. It must be in the Start menu folders or the Desktop.
- Open Shortcut properties, and assign the shortcut that will launch this app.
- Assign the same shortcut in reWASD to any kind of mapping you wish. We recommend Hold until release mode for this type of shortcuts.
17. I need to mute my mouse but do not understand how to use it on Desktop then
You can use Shift mode, empty Slot, adjust Autodetect or turn remap off using Ctrl+Alt+Delete hotkey. This case is described fully in a separate article.
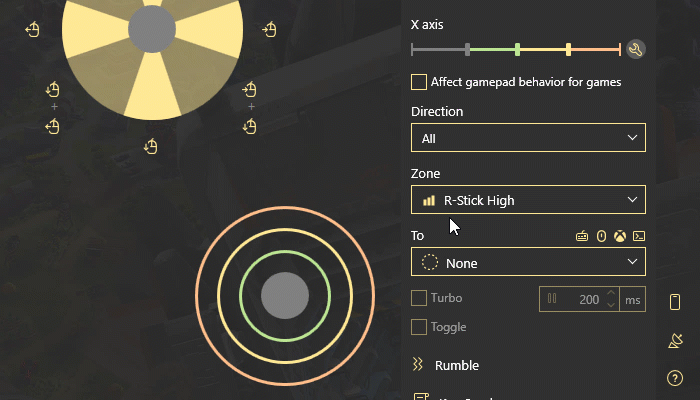
18. I want to map mouse moves + RMB/LMB (right mouse button or left mouse button) to the stick
This is usually used for MMOs, or point-and-click games. To make this kind of mapping, assign mouse moves to the stick, then go to Advanced Stick settings, tune Stick Zones (we suggest making one big zone: lessen Low and Medium, and expand High, for example), then assign LMB or RMB to the biggest zone:
19. I need to add right/left stick moves to the combo, but I don't understand how do I do that
The element you’re adding to the combo is the vertical or horizontal axis of a certain stick, and the number is the variable that fits array from -100 to 100. For example, you choose Right Stick X axis, and 100 will be the endpoint of the stick on the right, -100 will be the endpoint of the stick on the left. Here's the graph that shows the mappings corresponding to a certain stick position:
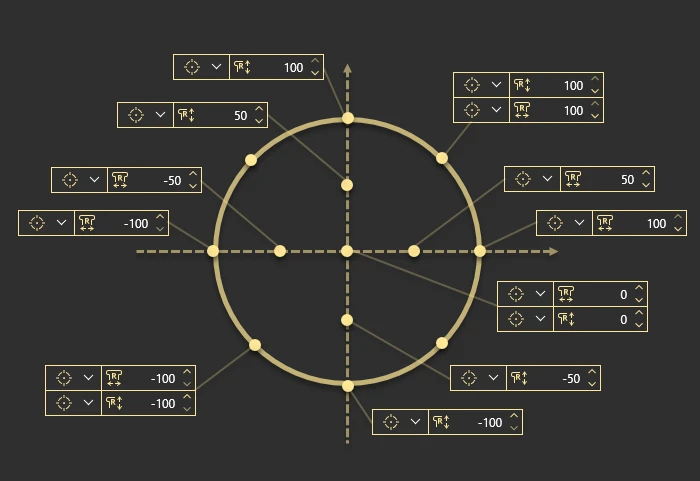
Note, that if you add Stick move to the Execute at once combo, you need to add the Stick element with 0, so the stick come back to the zero position when the combo is over. If you add several Stick moves, you need to add the exact number of Stick moves set to zero.
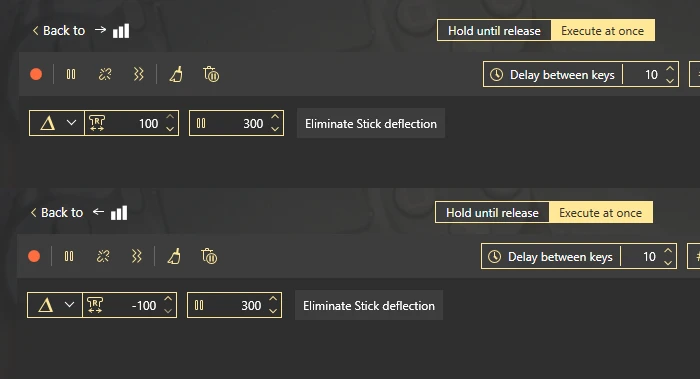
20. Relative stick deflection in combos
This type of stick deflection works on top of the deflection you perform, so you will be able to move the right stick freely to keep comfortable control over your character in games. Basically what you want to do, is to add the appropriate amount or stick deflection to the same button that causes your camera to move: camera goes up while you press button, so you want to add Right Stick down to it. Here is an example of use in control combo:
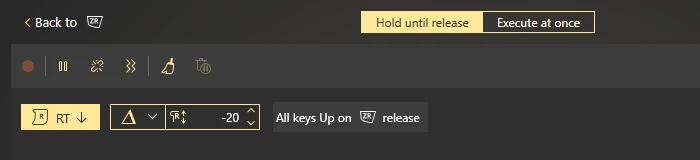
What we recommend first, is to test it in game, since you want different setting for any circumstances, and there's no universal formula to accomplish this. You will probably need different combos for different game styles too, you can add them with Shift mode. Shortcuts are also a good option: pick the combination of keys that will perform a required action, and assign the macro to them.
21. I want to add the 180°/360° turn on one click
This may be helpful if you use the virtual controller mapped to a physical controller, or the virtual controller mapped to a physical mouse and keyboard. To add a one-click turn, you will need to add one of the following combos.
This one worked for 360° turn in Fortnite. Add a Relative deflection of the left stick (100) to turn right, and configure the pause according to the game you make this preset for: 
This combo worked for 180° turn in Fortnite. Add a Relative deflection of the left stick (-100) to turn left, and adjust the pause according to the game you make this preset for: 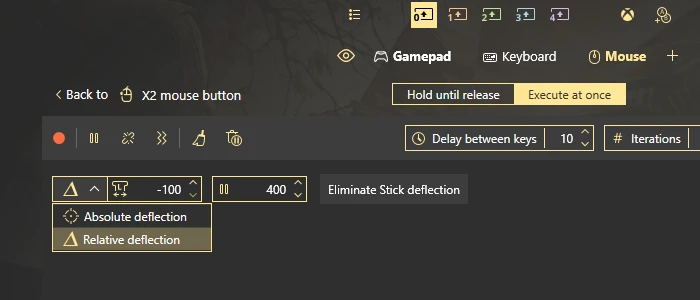
Since reWASD 5.4, you can assign this type of combos to the High Zone on mouse. Basically, when your mouse reaches the High zone (the size of which is adjustable), you can execute the combo that will help the mouse move be more natural. Head to Advanced mouse settings, then tweak the zone the way you need, and assign the combo to the mouse directions. You can pick directions one by one, which means, you can set one type of combo for Mouse Left, and another type of combo for Mouse Right.
The default config in reWASD currently has this combo mapped to High zone:
You can test it in game and figure out what combo would be better for you personally.
22. I want to use the radial menu, but the mouse with right stick is too slow to pick items in it
To use the radial menu, we recommend to turn on the Radial menu mode on mouse. To change it and save the regular layout, please follow these steps:
- Pick the key that activates radial menu: for example, if you need to press and hold D-pad Up to open the radial menu, assign this button to some keyboard key, let it be T
- Now choose the Shift layer and make T a Jump to Shift key
- Proceed to Mouse sub-config
- Assign Right Stick to mouse moves, and mute mouse moves. Open Advanced mouse settings
- Check Radial menu mode to turn it on, and set the Deadzone for mouse, if needed
- Adjust other settings and Apply the config
This way, when you press and hold the button that activates radial menu, you will be able to move the right stick more rapidly and pick the needed option from the radial menu.
23. I want to turn off the LED on my controller completely
To do that, please open LED settings, choose the controller that you want to turn off LED for, and deactivate all the settings, Apply the changes. Then click the icon on the left of the config name (the config you want to apply), and choose None for all the options. Reapply the config, and now LEDs will turn off when you turn remap on.
24. I want to use a Gyro Activation feature, e.g. use Gyroscope on demand only
This is possible with Shift mode: you can create a Shift layer of mappings, where you set up Gyroscope mappings the way you wish. Activate that layer by pressing and holding the Jump to Shift key, or if Jump to Shift is set to Toggle, click once to activate Gyro layer, and click once again to get back to Main mappings and disable Gyroscope.
25. I want to make my stick 8-way and digital, but I don't know how to set the mappings to diagonals
Open Advanced stick settings menu, and activate Use 8 digital directions. Now, choose each diagonal direction one by one, and add a key combo to them. We suggest using a Hold until release combo, that has two corresponding directions in it. For example if I want to set a mapping for Up+Left diagonal, I will add a key combo with Stick Vertical 100 + Stick Horizontal -100.
26. I want to remap gyroscope on my Joy-Cons separately for each Joy-Con
- Create a Group of Joy-Cons: click on the Group icon near the device name and add the other Joy-Con to the group
- Create an additional Gamepad Sub-config: click on the Plus sign in the row of Gamepad, Keyboard, Mouse to add one more Gamepad Sub-config. You will see it as Gamepad 2
- Now, you can add the mappings for the first Joy-Con in Gamepad Sub-config, and for the second one — in the Gamepad 2.
Keep in mind that Sub-configs Apply to the group of devices depending on the order of said devices: if your Right Joy-Con is the first device in the group, Gamepad Sub-config will be applied to it. Responsively, Left Joy-Con will have mappings from Gamepad 2 applied.
27. I want to set double-tap and hold for a key
This is possible if you use Key Combo and Turbo features. I'll make an X double-tap and hold as an example:
- Choose a key you want to add a mapping to and open a Key Combo menu
- Use Execute at once mode, and add the first key tap,
X down—X up. Add a pause in-between, or use Delay between keys - Now add the second key tap, add a pause in between
X downandX upnodes, set that pause to a high amount (try 60000 ms, which is one minute) - Go Back, and set that key to Turbo. You can use any pause on Turbo
- Apply and try in game or in the tester
Done! Now one press of the chosen key will execute one tap, then second tap with a hold.
28. I want to remove the Virtual Input Device for reWASD from my system
Before you do that, please remember that if there are no proper physical devices in the system, Keyboard and/or Mouse mappings will not work without the Virtual Input Device for reWASD.
- Open Preferences — Input Devices
- Choose substitutes for Keyboard and Mouse mappings emulation
- Click on Do not create Virtual Input Device for reWASD and confirm your choice
- Restart the PC to Apply the changes
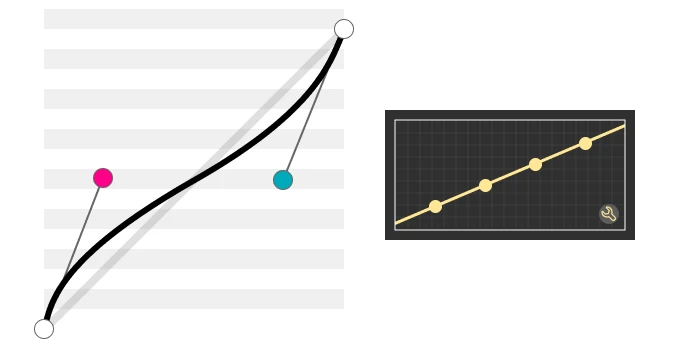
29. I want to replicate the Stick Response curve from another app in reWASD
A little disclaimer: we plan to add the possibility to use functions to build Response Curves in reWASD, so stay tuned!
Let’s start with basics:
- Y-axis of this graph is the speed of the cursor (if you map a stick to mouse); or the intensity of stick deflection (if you map a stick to the stick, or a physical mouse to the stick)
- X-axis represents stick deflection: from the resting state to the maximum
Both these axes have numeric values from 0 to 32768 in reWASD. So let’s say you have an image of the Stick Response curve you want to use in reWASD. Save it, screenshot the Custom response curve in reWASD, open a graphic editor and let’s get to work.
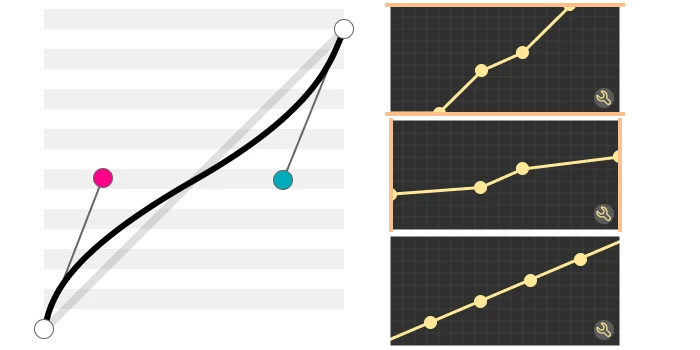
Place both images on one canvas:
Now crop the graphs to the ‘modifiable’ area, so all you had on both curves was only the canvas. You should have the first dot in the lower-left corner, and the last dot in the upper-right corner. Max out the first and the last dot in reWASD to see where the limits are for our graph:
Place your desired curve on top of reWASD canvas, so (0,0) are in the same spot. Reduce the opacity of the top layer to make this easier:
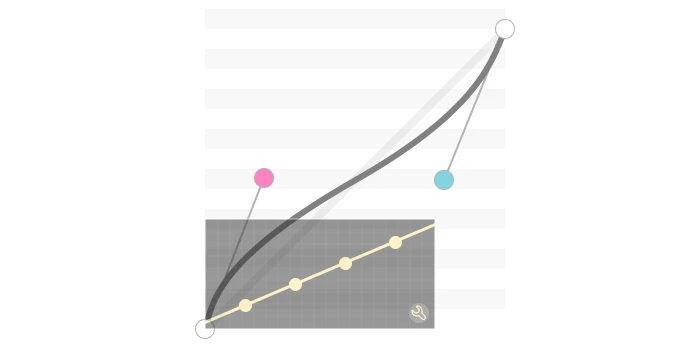
Drag the upper-right corner of your curve to reWASD canvas:

And since you have 4 dots at your disposal right now, spot the ‘fractures’ and place the dots there. Check the modified curve and see where the straight lines interrupt and change their trajectory:

Now you can remove the layer that has your draft curve, and connect the dots you placed earlier to see the full curve:

Once that is done, you can place the curve in reWASD: if you have the lower layer with the Default dots placements on your image, that will help you to navigate your newer curve on the graph, dot by dot:

If you wish to measure the exact positions of each dot
Define the center of the dot; drag a horizontal line to Y axis, and a vertical line to X axis from the center of your dot:

Then use the measuring tool (e.g. Ruler tool in Photoshop) to get two sizes: size a for the overall size of one axis; size b for the dot placement (from 0 to the place where your dot is on chosen axis).
Mine here are a = 233.13 and b = 168.69.

a equals 32768, and b is unknown.
a = 32768
b = x

x = (32768 × b) / a
Let’s count using my example:
x = (32768 × 168.69) / 233.13 = 23710.52
Since reWASD uses whole numbers for the graph, let this be 23711. And this is the X value for my dot.
The same principle can be used for Y value. My measurements are a = 98.84 and b = 63.00:

a = 32768
b = y

y = (32768 × b) / a
Let’s count using my example:
y = (32768 × 63.00) / 98.84 = 20886.11 ≈ 20886
The Y value for my dot is 20886. So now you can use the values (23711,20886) in reWASD to place this dot. You can use the same method to calculate all the other coordinates and place them in reWASD.
30. I want to remap the additional buttons on my controller (buttons that do not show up in reWASD)
This workaround originated from a Forum post, kudos to Badibbou for the solution. This will work if your controller has native remapping software, so make sure you have it installed by the time you wish to try the following steps:
- Set a certain controller button to be a Jump to Shift button in reWASD. As an example, let’s make RB a Jump to Shift 4 button
- Now in reWASD within a chosen Shift layer, assign the desired mapping for the additional button to one of the XYAB keys. In our case, within Shift 4 layer, we set B to a macro
- In the native controller software, remap an additional button of your choice to one of the XYAB keys from Step 2. So, we remap a back button to B
If you are using a grip with several additional buttons, they usually have some mappings assigned to them. And you don't need to remap them in the native software. Same goes for controllers that have pre-defined additional button assignments, usually the face buttons (XYAB).
Once you’ve done that, and Applied all the settings, press the Jump to Shift key to get into the Shift layer, then click an additional button — a macro assigned to one of the XYAB keys will reproduce.
Please note, that you can avoid the sacrifice of action for the Jump to Shift button:
- Use Shortcuts to assign the native Jump to Shift mapping to a certain combination of key presses (we used RB as Jump to Shift, and added LB+RB Shortcut to work as RB).
- Use Activators and assign the native Jump to Shift action to Double or Triple press (we used RB as Jump to Shift, and while Single press did not have any mappings, Double \ Triple press had RB mapping assigned to it). Or vice versa: set a Double or Triple press as a Jump to Shift button, to save the Single press as a native mapping.
31. I want to remap the additional buttons, and the native software of my controller allows me to assign combos to additional buttons
Long story short, you'd need to assign combos within the native software, then create the same Shortcuts in reWASD and assign mappings to them.
Keep in mind, that you would need to use about 4 buttons to create those Shortcuts, and it's better to use the keys that you don't use often. Shortcuts have a Press time parameter: reWASD basically waits for you to press the other Shortcut participant to execute an assigned mapping. So if you use Y key in the Shortcut, then press only Y during gameplay, reWASD will wait for the set Press time to pass before firing the Y mapping. Lowering Press time should be useful too!
Let's see the long version now:
- Assign combos within the native software: each of additional buttons should have a unique combo. Consider that in terms of reWASD Shortcuts A+B and B+A combos are the same.
- Now, open Shortcuts menu in reWASD and create Shortcuts with the combos that you made in the native software.
- Once that is done, you can add the mappings to Shortcuts: once you turn remap ON and press the additional button, that mapping should fire.
- Don't forget to lower the Shortcut Press time.
All done!
32. I want to remap a physical mouse move to something other than Left stick or Right stick
The main idea is to remap mouse moves to one of the sticks, and minimize the stick input. Then add the mappings that you need to Mouse Zones.
- Remap mouse moves to Left or Right stick, it is up to you (preferably choose the stick that you won't use in this config)
- Get to Advanced mouse settings, set the Custom stick response curve, and make sure you have all the dots aligned horizontally as low as possible: drag the first dot on the left to the very bottom, then gradually drag the next ones there too. Make sure that the 4th dot is in the lower-right corner
- Since you can set mappings to Mouse high zone only, expand it by sacrificing the yellow zone
- Assign the needed mappings to the mouse Directions responsively: as an example, if you set RT for the Up direction — RT will execute while you move the mouse Up
- Don’t forget to set the Jump to Shift so you could get the actual cursor back when needed, and you can test it out in game!
Here's a bit more info on how to work with a muted mouse. After the first test-drive you may need to tweak such settings as Smoothing, Noise Filter, Sensitivity.
33. I use an emulator, and it doesn't work with Virtual DS3 emulated by reWASD, or physical DS3 controller
Some DS3 gamepads are using libusb driver, which is not supported by most emulators except PCSX2. To make sure your physical gamepad has a more suitable and widely-used driver, please install an official one — sixaxis driver.
If you want to use the PCSX2 emulator with our Virtual DS3 controller (or any DS3 controller that uses sixaxis driver) — we got you covered: get the modified version of PCSX2 that allows you to use the DS3 gamepad with the sixaxis driver.