Remapping mouse

Remapping a standard mouse
If you have a standard mouse without additional buttons, follow these steps to remap the mouse:
- Download and install reWASD
- Launch reWASD and make sure that your mouse is connected to the PC
- Choose the mouse (or a group of devices that includes mouse) you want to remap in the Device list
- Create a new profile by clicking the Plus sign at the bottom of the Profile list: set the name of a game, add a background picture if needed, and click Add. The config is created automatically
- Pick Mouse in the menu on the top of reWASD window
- Add some mappings: choose the key you want to remap, and then add a mapping to it. Repeat until you add all the desired mappings
- Once you’re done, press Save if you want to keep the changes, or press Apply if you want to try the config right away. When you press Apply the config is saved automatically
- Once the config becomes active, you will see Remap is ON in the bottom left corner. To eliminate the active config, press Remap is ON button, and you will see the Remap is OFF indicator. Press it once again to switch remap back ON.
Remapping mouse scrolls
reWASD allows you to remap the scroll wheel and customize its behavior to suit your needs. To do so, open the Mouse sub-config, select one of the scroll directions, and assign the desired mapping to it. Starting with reWASD 9.0, you can also remap horizontal scroll to expand your options.
- Scroll delta is the setting that defines the relation between the intensity of scrolls you perform on a physical mouse, and the output you get. This slider lets you choose how long a single scroll will be. The bigger value you choose, the fewer mappings you will get when you scroll once. Each mouse has different characteristics, so we recommend testing it in game first, and this way define the sweet spot.
For example, let's say you perform the same move with the minimum Scroll delta value, and the maximum Scroll delta value. In the case with the minimum value, the mapping may fire from 6 to 10 times. In the case with the maximum value, and making the same move (same speed and intensity), the mapping will fire 1 time.
- Use the same value for all directions permits setting different Scroll delta values for different directions.
- reWASD mapping is where you need to assign the mapping. Don't forget that you can filter the mappings by clicking on the icons of Keyboard, Mouse, Controller, Commands.
- Mute mutes the native behavior of a scroll.
- Key Combo allows you to assign a combo to the scrolls.
Remapping a mouse with programmable buttons
If you have a gaming mouse with additional programmable buttons, it may be reported to reWASD as an unknown device.
Note, that some devices (for example, Logitech G502 or G300S) have On-Board Memory option in the native software, which is set by default. That is the option you need to make your mouse cooperate with reWASD properly.
If you use a Corsair mouse with additional buttons, it may be reported as several devices to reWASD. One of them allows you to remap the main (basic) mouse buttons, like LMB, RMB, MMB and two side mouse buttons. If you have more than those five buttons on your physical mouse, they may show up as a separate device in reWASD. To check that, use Detection mode, and click the specific additional mouse buttons you wish to remap. Use the highlighted device in reWASD to remap those additional mouse buttons.
To initialize the mouse and add the mappings to it, you need to do the following:
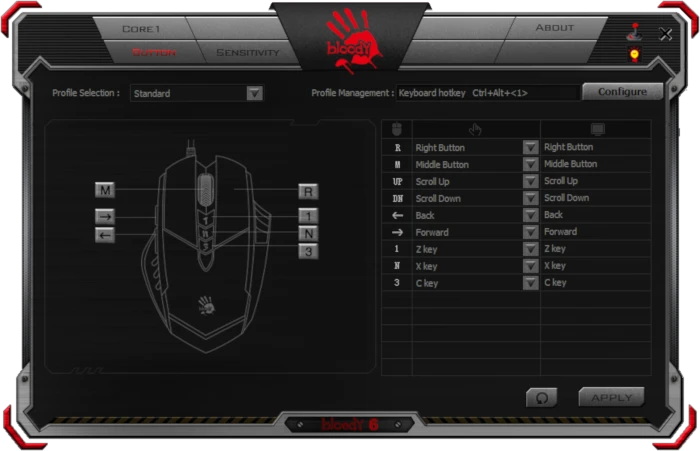
- Download, install reWASD, and also install the native software for your particular mouse (I have an example with Bloody A6 mouse and Bloody6 software)
-
Now open the button mapping section in the native software of your mouse. Since reWASD can map Left mouse button, Right mouse button, Middle mouse button, X1 and X2 (two buttons that your mouse usually has at the side), you need to assign some keyboard keys to all other mouse buttons. I will map 1 to Z, N to X and 3 to C, the keys that you choose to map are up to you:
![Remapping mouse]()
-
Launch reWASD and make sure that your mouse is connected to the PC
-
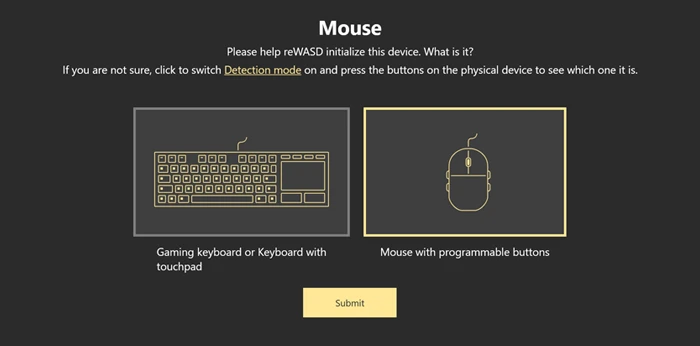
Check the lower left corner, find the icon with a question mark and click on it. You will see the following window:
![Remapping mouse]()
-
Pick the relevant option, and press Submit. Now you can add mappings to it
Keep in mind, that if remap does not work properly, there is a chance that the mouse was not initialized properly. You can start from scratch and re-initialize it: open Preferences — General, and click Clear data. Then, make sure to use Detection mode to make a right choice.
-
Choose the mouse (or a group of devices that includes mouse) you want to remap in the Device list
-
Create a new profile by clicking the Plus sign at the bottom of the Profile list: set the name of a game, add a background picture if needed, and click Add. The config is created automatically
-
Pick Mouse in the menu on the top of reWASD window
- Add some mappings: choose the key you want to remap, and then add a mapping to it. Repeat until you add all the desired mappings
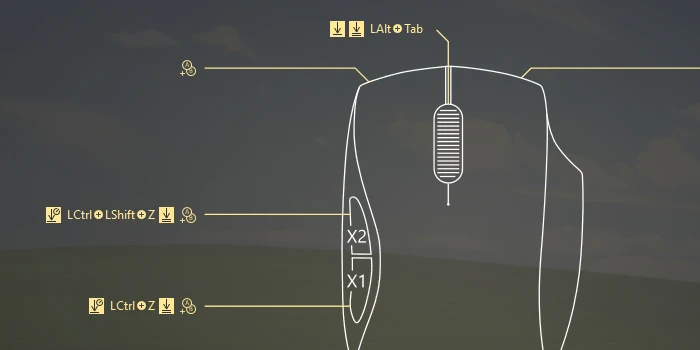
- To map the keys that you assigned in the native software, you need to click the Keypad icon on the right part of reWASD window:
![Remapping mouse]()
-
You will see the table, now press Add to create the new mapping. Don't forget to Mute the additional buttons too, to prevent unwanted actions. I will choose Z, X, and C at the left part and assign some combos to them in the right part:
![Remapping mouse]()
-
Once you’re done, press Save if you want to keep the changes, or press Apply if you want to try the config right away. When you press Apply the config is saved automatically
-
Once the config becomes active, you will see Remap is ON in the bottom left corner. To eliminate the active config, press Remap is ON button, and you will see the Remap is OFF indicator. Press it once again to switch remap back ON.


