LED settings
LED settings is a way to customize your LED to suit your style.

What devices can reWASD work with LED on:
- DualShock 4
- DualShock 3 (Player LED)
- PS3 Navigation
- Nintendo controllers
- Nintendo Switch Online
- Steam controller
- Razer Keyboards
- Razer Mice
- DualSense
- Xbox Elite 2 (works with wired or Xbox Adapter connection)
- Xbox Series X / One S (works with firmware version 5.11+, via wired or Xbox Adapter connection)
- Flydigi controllers (supported for Apex 2, Vader 2 Pro and Vader 2 in Android mode)
What LED modes are available in reWASD:
- Solid glow
- Shimmer
- Heartbeat
- Stroboscope
- Breath
- Rainbow
Please note, that the LED settings require reWASD Background agent enabled. Make sure to check Preferences — Tray Agent tab.
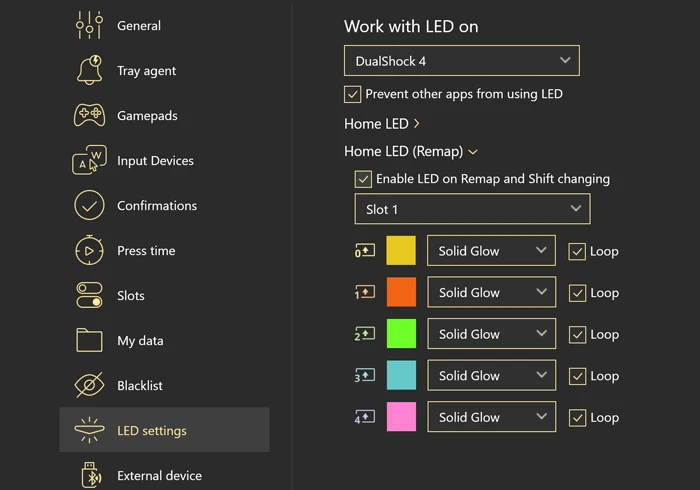
This tab permits changing the settings for any devices from Work with LED on list that will be connected to this PC with reWASD running. The view of this window will change depending on what device you have chosen to customize.
To turn off LED completely, please open LED settings, choose the controller that you want to turn off LED for, deactivate all the settings, Apply the changes. Then click the icon on the left of the config name (the config you want to apply), and choose None for all the options. Reapply the config, and now LEDs will turn off when you turn remap on.
For DualShock 4, to turn off LED completely, set the LED in the config you are using with DS4 to Solid Glow and set the color to Black for all the layers you are using. Then visit the LED Settings in the Preferences menu and uncheck Enable LED. If your DualShock connected via USB, you might need to repeat all the steps from the beginning after reconnecting it.
How to change the LED settings in configs
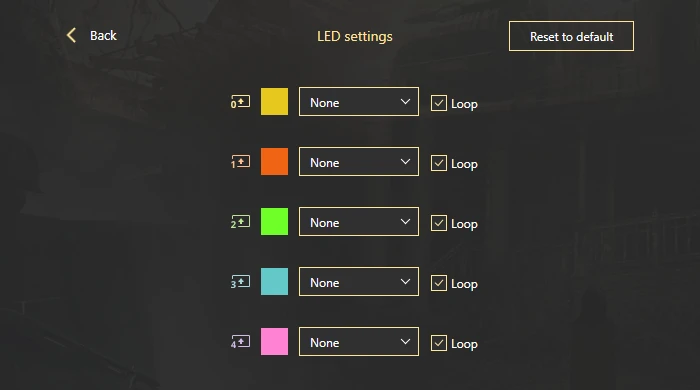
Each config has LED settings as well, and they override the settings in Preferences. If you wish to customize the way LED behaves when a certain config is applied, click on the colored icon near the name of a certain config, and the following window opens:

These settings look similar to the ones in Preferences, and permit changing the Shift switching modes and colors. Change the color (which will apply to DualShock 4 and Razer devices only), change the Mode for LED, pick whether to Loop the LED light. If you want to start over, click Reset to default.
Work with LED on DualShock 4 and DualSense
Prevent other apps from using LED — permits reWASD to apply the LED settings after you turn remap ON.
Player LED — available for DualSense only
Turn Player LED on when: — choose when to activate Player LED.
The next settings are for the Controller is connected option:
Define the player number for: — choose a controller to define the player LED for it.
Player LED — pick the Player LED
Common LED
Enable LED when the battery is low — allows customizing the way LED warns you about low battery. You can change the color, the mode, and whether to loop the warning.
Enable LED when the battery is critical — set up how the LED warns you about the critical battery level. You can change the color, the mode, and whether to loop the warning.
Enable LED when controller is connected — permits to set the color for LED when the gamepad is connected to PC.
Common LED (Remap)
Enable LED on Remap and Shift changing — adjust the way LED reacts to Slot and Shift change. By default, each slot has different LED mode, and each Shift layer has the color assigned to it (which resembles the color of the Shift icon).
Microphone LED — available for DualSense only
Enable LED on Remap and Shift changing — adjust the way Mic LED reacts to Slot and Shift change. You can set different modes for this LED, and this particular LED can only light up in one color and one intensity due to the hardware characteristics.
Work with LED on DualShock 3 controller
Prevent other apps from using LED — permits reWASD to apply the LED settings after you turn remap ON.
Player LED
Turn Player LED on when: — choose when to activate Player LED.
The next settings are for the Controller is connected option:
Define the player number for: — choose a controller to define the player LED for it.
Player LED — pick the Player LED
Common LED
Blink when the battery is low — keep this option active to get a warning when the battery is low.
Work with LED on PS3 Navigation controller
Prevent other apps from using LED — permits reWASD to apply the LED settings after you turn remap ON.
Common LED
Enable LED when — allows activating LED when one of these actions happen: Device is connected, Remap is ON, Never.
Blink when the battery is low — will notify you when the controller needs to be charged.
Work with LED on Nintendo controllers
Prevent other apps from using LED — permits reWASD to apply the LED settings after you turn remap ON.
Player LED
Turn Player LED on when: — choose when to activate Player LED.
The next settings are for the Controller is connected option:
Define the player number for: — choose a controller to define the player LED for it.
Player LED — pick the Player LED
Common LED
Enable LED when the battery is low — keep this option active to get a warning when the battery is low, and customize the way you will be notified about the low battery.
Enable LED when controller is connected — keep this option active if you wish the LED to be active when you connect the controller. You can also customize the brightness for Nintendo Switch Pro controllers, and choose whether to Loop the LED or not.
Common LED (Remap)
Enable LED on Remap and Shift changing — adjust the way LED reacts to Slot and Shift change. By default, each slot has different LED mode.
To turn off LED completely, please open LED settings, choose the controller that you want to turn off LED for, deactivate all the settings, Apply the changes. Then click the icon on the left of the config name (the config you want to apply), and choose None for all the options. Reapply the config, and now LEDs will turn off when you turn remap on.
Work with LED on Nintendo Switch Online controllers
Prevent other apps from using LED — permits reWASD to apply the LED settings after you turn remap ON.
Player LED
Turn Player LED on when: — choose when to activate Player LED.
The next settings are for the Controller is connected option:
Define the player number for: — choose a controller to define the player LED for it.
Player LED — pick the Player LED
Work with LED on Steam controller
It's important to know, that Steam controller LED is monochrome, so you can adjust the mode for LED, and the brightness for it.
Prevent other apps from using LED — permits reWASD to apply the LED settings after you turn remap ON.
Common LED (Remap)
Enable LED on Remap and Shift changing — adjust the way LED reacts to Slot and Shift change. By default, each slot has different LED mode, and due to the Steam controller characteristics, only white color is available in this case. You can customize the brightness of LED for different Shift layers.
Work with LED on Razer Keyboards and Mice
Remember, that to use LED in Razer devices, you should install Chroma Connect in Razer Synapse.
Common LED (Remap)
Enable LED on Remap and Shift changing — adjust the way LED reacts to Slot and Shift change. By default, each slot has different LED mode, and each Shift layer has the color assigned to it (which resembles the color of the Shift icon).
Don’t forget to press Apply to save the changes. Press Back to return to the main interface.
Work with LED on Xbox One S / Series X
Please note, that you can adjust Xbox One S LED if you have installed the firmware version 5.11+, and with wired or Xbox Adapter connection.
Prevent other apps from using LED — permits reWASD to apply the LED settings after you turn remap ON.
Common LED
Enable LED when the battery is low — keep this option active to get a warning when the battery is low, and customize the way you will be notified about the low battery.
Enable LED when controller is connected — keep this option active if you wish the LED to be active when you connect the controller. You can also customize the brightness for Xbox One S / Series X controllers, and choose whether to Loop the LED or not.
Common LED (Remap)
Enable LED on Remap and Shift changing — adjust the way LED reacts to Slot and Shift change. By default, each slot has different LED mode.
Work with LED on Xbox Elite 2
Please note, that you can adjust Xbox Elite 2 LED with wired or Xbox Adapter connection.
Prevent other apps from using LED — permits reWASD to apply the LED settings after you turn remap ON.
Common LED
Enable LED when the battery is low — allows customizing the way LED warns you about low battery. You can change the color, the mode, and whether to loop the warning.
Enable LED when controller is connected — keep this option active if you wish the LED to be active when you connect the controller. You can also customize the mode for Xbox Elite 2, and choose whether to Loop the LED or not.
Common LED (Remap)
Enable LED on Remap and Shift changing — adjust the way LED reacts to Slot and Shift change. By default, each slot has different LED mode, and each Shift layer has the color assigned to it (which resembles the color of the Shift icon).
Work with LED on Flydigi controllers
Please note, that due to the particular specifics of Flydigi gamepads, you can adjust LEDs on Apex 2, Vader 2 Pro and Vader 2 in Android mode.
Prevent other apps from using LED — permits reWASD to apply the LED settings after you turn remap ON.
Common LED
Enable LED when the battery is low — allows customizing the way LED warns you about low battery. You can change the color, the mode, and whether to loop the warning.
Enable LED when the battery is critical — set up how the LED warns you about the critical battery level. You can change the color, the mode, and whether to loop the warning.
Common LED (Remap)
Enable LED on Remap and Shift changing — adjust the way LED reacts to Slot and Shift change. By default, each slot has different LED mode, and each Shift layer has the color assigned to it (which resembles the color of the Shift icon).