Shift mode
Starting with reWASD 6.4 Shift mode is a feature that permits creating up to 10 overlays with mappings that differ from the Main layer. Jump to Shift in Hold mode is available if you have a membership (or as part of a legacy license) or during the trial period. Jump to Shift with Toggle, or Custom mode requires the Rapid Fire feature.

Each Shift or Main layer has a contextual menu. You can use it to:
- Copy the whole layer
- Paste the previously copied layer on other layer
- Rename this layer: this name will show up when using Desktop Overlay
- Clear the current layer
To set up a new Shift layer, follow these steps:
- Add mappings to the Main layer (Layer 0)
-
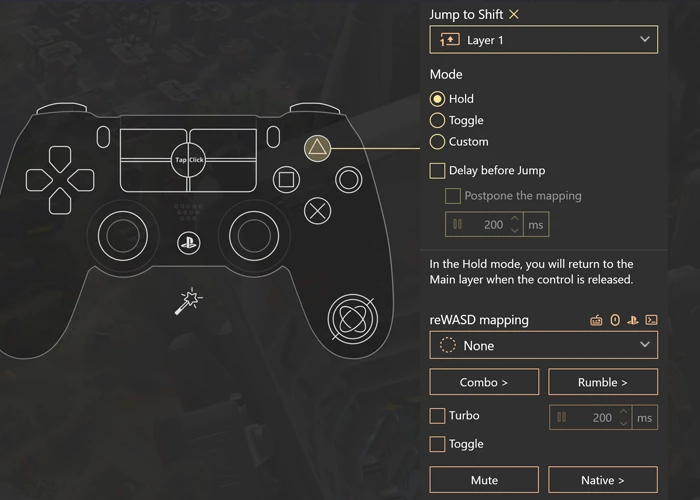
Now, we need to set how you will activate the Shift layer of your choice. Starting with reWASD 6.1, you can assign Jump to Shift mappings to any Activator, or Shortcut that use digital keys. Choose the appropriate control, and click on Shift mode option. Once you've done that, you will see the following frame, and settings you need to adjust:
![Shift mode]()
- Jump to Shift option allows you to choose what layer will be active once you press this key
-
Mode allows to choose how Jump to Shift will work:
- Hold — hold the Jump to Shift button in order for the Shift layer to remain active
- Toggle — press once to activate the Shift layer, press again to get back to Main
-
Custom — set different buttons to exit the Shift layer and get back to Main, or Jump to another Shift layer. With this mode, you are not restricted with one Jump to Shift button
Please note, that if you use the Custom Mode and don't set the Jump to Layer 0 (Main) you will be stuck in the Shift layer until you reapply the config. To use the Emergency remap OFF, press Ctrl+Alt+Del combo on your physical keyboard.
-
Delay before Jump permits adding the pause between the physical buttons press and the moment Shift layer becomes active
- Postpone the mapping — execute the mapping set to the Jump key along with Shift layer activation
The lower part of the frame is the same as any mapping frame: to set the mapping for a Jump key, open Shift mode menu first.
Note, that the color of mapping will change according to the chosen overlay: Shift 1 — red, Shift 2 — green, Shift 3 — blue, Shift 4 — purple. While the main mappings will stay yellow.
-
Choose the Shift icon on the top of reWASD window, and modify mappings from Main, or add new ones. If you don’t assign any mappings to a certain control inside the Shift layer, it will reproduce as a mapping from Main layer.
If you used the Custom Mode for Jump to Shift key, make sure to add the Jump to Layer 0 inside the Shift layer. Or, if you want to Jump to other Shift layers, make sure that the last layer you jump to has the Jump to Layer 0 control.
-
Press Apply, and you’re good to go.
If you don’t want the button inside the Shift layer to reproduce as the mapping from Main, pick Do not inherit option from the reWASD mapping drop-down list; this way when that Shift layer is active, the not-inheriting key will work normally, as if no mappings are applied to it.
If you have added any mapping to sticks or trigger zones, and you don’t want them to reproduce while the Shift overlay is active, you’ll need to open the Stick settings inside the shift and pick Do not inherit for the zones as well
If you add a Toggle mapping to the Shift overlay, you will need to activate the Shift layer both to turn the toggle on and off. Learn more about how to stop all macros from reproducing.