Advanced Stick settings
Advanced Stick settings are fully adjustable with Advanced Mapping feature and is available if you have lifetime access (or have purchased it separately as part of a legacy license) or during the trial period.
Here is a list of Advanced Stick settings:
Mute — turns off the native stick behavior completely. This feature is available if the Advanced Mapping feature is purchased, or if the trial period is active. Useful for the case when you want to assign keyboard keys or mouse moves to the stick, and need to mute the controller input. Once you activate this, Stick Response, X and Y Invert and Hardware Deadzone become inactive.
Rotation — permits to set the angle for your stick. The possible range to rotate the stick is -45°..45°, so if you wish to rotate the stick more, consider inverting the axes or swapping mappings.
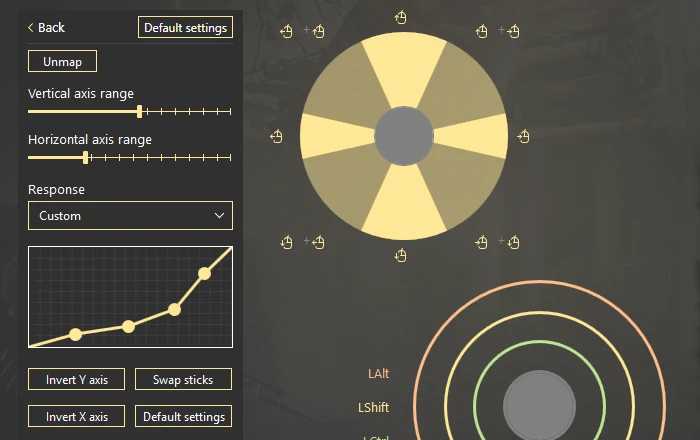
Vertical and Horizontal axis range — permits tuning the range where directional mappings reproduce exclusively, or together. This feature is available if the Basic license is purchased, or if the 7-day trial is active. The further to the right those sliders are, the less transitional movements will reproduce.
As an example, let’s say you have set WASD to the stick, and maximize both Horizontal and Vertical axis range. You can see that the W+A, A+S, S+D and W+D movement range is tiny, that means that while you move the stick, W, A, S and D will mostly reproduce exclusively. So a character in the game will run straight forward, left, etc. On the contrary, if you minimize both Horizontal and Vertical axis range, the stick will more likely reproduce as W+A, A+S, S+D, and W+D then W, A, S and D separately.
Use 8 digital directions — converts the stick to the digital mode, and permits you to assign mappings to 8 directions. You can assign the mapping for up, down, left and right directions from the Main mappings menu, and set the remaining diagonal mappings in Advanced stick settings menu.
To set the mappings to diagonal directions, choose the needed Direction from the drop-down list, then add a mapping To it. You can assign key combos to diagonal moves as well.
Please note, that Vertical and Horizontal axis range has impact on a digitalized stick.
Stick Response — changes the way the stick behaves. reWASD proposes 6 profiles (Default, Delay, Aggressive, Instant, Smooth, and Custom) that differ with the stick response curve. All profiles, except Custom, are available for Xbox Elite controller by default. All 6 profiles, including Custom, are available for the Advanced mapping feature owners. Default Stick Response profile is the only one available for Basic license.
Note, that Custom profile gives an opportunity to modify the curve with four dots you can move. There’s a graph that demonstrates the details of existing profiles so you could see what profile is the best to choose. Remember, that Y-axis of this graph is Cursor speed, and X-axis is the line of Stick deflection: from the resting state to the maximum.
You can Copy, Paste and Clear curve settings. To do so, right-click the graph, then choose the relevant option.
Invert Y and X axis — inverts the axis of a chosen stick. Available with Advanced Mapping feature, and for Xbox Elite controllers.
Swap Sticks — replaces left stick with a right stick, and vice versa. Available with Advanced Mapping feature, and for Xbox Elite controllers. Works both for keyboard and mouse mappings, and for controller ones.
Default settings— turns your stick back to default settings. Available with Basic license, or with a 7-day trial in the latest version of reWASD.
Stick Zones — changes the Deadzone, Low, Medium and High zones, and permits adding mappings to them. Learn more about Stick zones.
After you are done, click Back on the top of the left list of settings to return to the main view. Click Default settings to reset the stick to the default state.
Flick Stick
Since reWASD 5.8, we have implemented the Flick Stick functionality, originally created by Jibb Smart. It is a mode where your stick acts as a mouse, and allows you to instantly turn your character to any point of a 360-degree analog stick. It works best in conjunction with the Gyroscope, that will act as Y axis, while Flick Stick takes care of X axis.
Keep in mind, that Virtual mouse settings do not affect Flick Stick
To enable Flick Stick on your controller, follow these steps:
- Choose a controller you want to use (a gamepad with gyro is preferable)
- Create a new config, or choose an existing one
- Choose any direction of a Right stick (or the Left Stick), and click Flick Stick
- You'll see several settings you need to configure for each game individually:
- X Sensitivity is the mouse sensitivity parameter
- Threshold defines at what point of stick deflection the flick will fire
- Smoothing makes Flick Stick less jittery
- Duration is the amount of time each flick would take
- If you wish to use Flick Stick along with Gyro, make sure to add the mappings to Gyroscope too: choose Gyro or Tilt mode, add mouse moves to Y axis, add some Commands to manage gyro
- Assign additional binds, and you're good to go
X Sensitivity is the parameter you, most likely, will spend the most time tuning. The main task for you here is to find the X Sensitivity value that will make a full circle on your physical stick also a full circle for your character's field of view in game. Eventually, you should be able to flick the stick to a certain angle, and that's where your character will turn instantly (in Duration time).
Here are some tips that may come in hand:
- Before you start messing with X Sensitivity, make sure to minimize the possible acceleration in game too: if you have an option to choose Raw input for mouse, do it.
- The way Flick Stick performs strongly depends on in-game settings for mouse, so make sure not to mess with the in-game mouse sensitivity while you're figuring out X Sensitivity in reWASD.
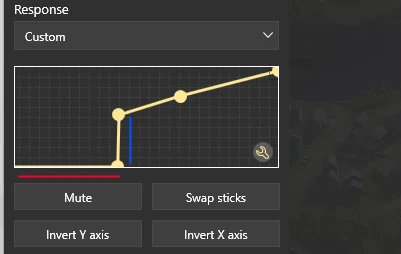
- To set the deadzone for an External Virtual Nintendo Switch Pro controller, use the Stick Response graph. The default graph emulates a deadzone from controller flash memory used by most console games.
-
- If you need to change the deadzone, move the first point to the zero position under the second point (marked with a red line) the way it is shown in the picture.
- The height between the first and second points (marked with a blue line) affects the console flash deadzone.
- Note that these changes require config reapplying, after which your device will be automatically reconnected.
- To check whether you have set the correct X Sensitivity, you can Apply the change you made, then deflect stick up, and rotate it 360° several times.
- If your character is facing the same spot after you've circled the stick, congrats, you have found the perfect value
- If you didn't get to that starting point, raise the X Sensitivity
- If you surpassed the starting point, decrease X Sensitivity