First launch
1. Authorization Process
To access reWASD, you must log in to use all features. The process is quick and secure:
-
Launch reWASD and access the Sign-In screen.
-
Choose one of the following options:
-
reWASD Account: Log in with your registered email and password.
-
Google Authorization: Sign in using your Google account (available if you previously signed in or linked your account).
-
So I loged in, what is next?
After your first successful login, you'll see the Quick Guide — an interactive walkthrough designed to introduce you to reWASD basics. It guides you step-by-step through the initial setup, helping you select your device, create or apply configs, and quickly understand the key interface elements.
-
Follow the guide to become familiar with reWASD essentials in just a few clicks.
-
You can skip it if you prefer exploring on your own. Don’t worry—it's always available via Account → Run the Quick Guide.
Quick Guide overview:
-
Welcome to reWASD
Let’s quickly set up your first config together!
-
Choose your device
Select either a controller or keyboard and mouse. reWASD will help you initialize and group your devices correctly, ensuring everything works perfectly.
-
Choose a profile
Pick from a selection of ready-made profiles designed for popular use cases, or create your own profile from scratch.
-
Finalize your config
Get valuable tips and hints to customize your config for the best gaming experience. On this step you're already ready to click Apply and run your first ever config.
Once you've completed (or skipped) the Quick Guide, you're ready to dive deeper into reWASD.
Let’s explore what you'll see next on the main interface:
I skipped the Guide, I want to learn everything on my own. 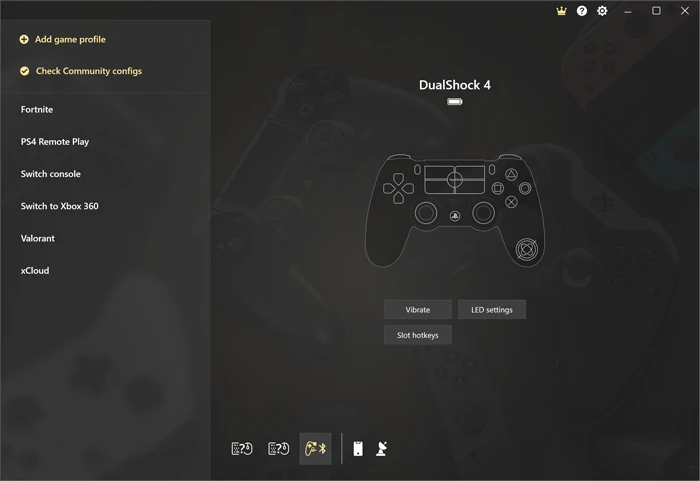
On the right side you see a Profile panel:
- Profile is an element that contains configs, usually, one profile is created for one game.
- Config is the file that contains all the mappings and layout modifications you add.
In the file system, Profile is a folder, and Config is a file.
Below the device's image is the Device panel: here are all the devices you can initialize, group, and remap. You can also see two icons on the right of the devices list:
- reWASD Mobile — shows where to download an application for Android or iOS
- Device Detection icon — helps you during Device initialization (for keyboards and mice only)
Top-right corner gives access to License information, Help (you are here), and Preferences.
In the center of the screen, you see an active (chosen) device and several quick options that will help you manage it.
Short guide
- Choose the device you want to remap
- Pick an existing Game Profile or create one
- Add the desired mappings and Apply changes, or Apply a previously created config right away
To get more in-depth with reWASD interface, check out the Workspace article.
Longer guide
The next step may differ depending on how you plan to use reWASD:
- I want to remap a controller
- I need to remap mouse and keyboard
- I want to use several different devices at the same time, and only have one output visible for games
I want to remap a controller
-
Connect your gamepad to PC, find and choose it in the Device panel
-
Choose the Profile, or create one. The Config is created automatically
If you don’t feel like customizing the layout from scratch, click on Check Community configs. There are numerous pre-made configs shared by our users.
-
Now, what input should reWASD emulate for you?
-
If you wish reWASD to emulate mouse and keyboard inputs, choose a controller button and pick the mapping from reWASD mapping list
-
If you want to emulate the other controller type, click the Magic Wand and choose the disguise for your gamepad: Xbox 360, Xbox One, DualShock 4, DualShock 3 or Switch Pro
-
-
If emulation doesn’t sound fun we have two ways to apply your config when reWASD won't emulate any devices, but your controller will be remapped:
4.1. Click the Magic Wand icon and ensure that your physical gamepad is selected. Utilize only gamepad mappings from the reWASD mappings list. Find more details on how to apply mappings to your physical gamepad.
4.2. Use Native menu to reassign the controller buttons. -
Once the layout is done, press Apply in the lower-left corner, and enjoy!
I need to remap mouse and keyboard
-
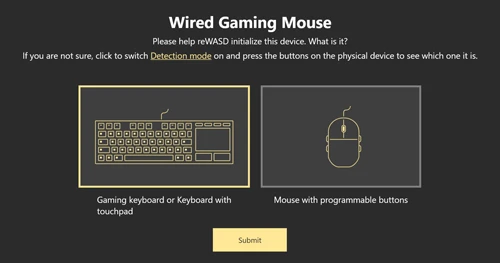
If you see at least one device with a [?] in the Device panel, you should start with Device initialization. Choose the device with [?], then you will see a screen like this:
![First Launch]()
-
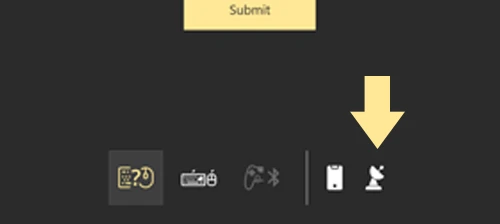
To properly define which device this is, click the Device Detection icon:
![First Launch]()
-
With Detection mode on, reWASD will light up the device you are pressing your buttons on. Now press the buttons on keyboard, if the chosen device lights up — choose Gaming keyboard or Keyboard with touchpad option. If you press mouse buttons, and the active device lights up — choose Mouse with programmable buttons option.
-
Click Submit, and repeat initialization until both keyboard and mouse you want to use in-game are initialized
-
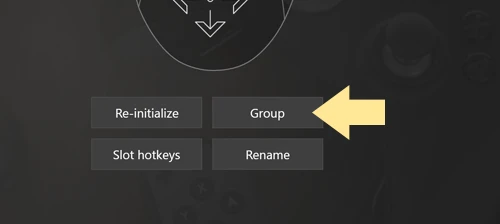
Once you’re done, Group mouse and keyboard together: choose either one of them, click on Group button below the image of the device:
![First Launch]()
-
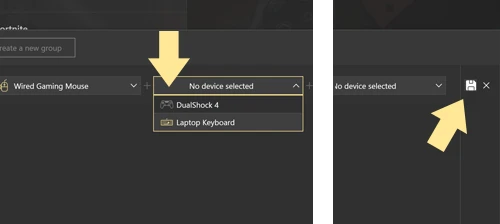
A Group window opens. Choose the second device from the drop-down list, and press Save:
![First Launch]()
-
Time to remap! Or, use one of the pre-made configs. Click Check Community configs to look for the configurations made by other users. They are sorted by game, so you can look up the exact game you will play, and choose a config you like the most.
-
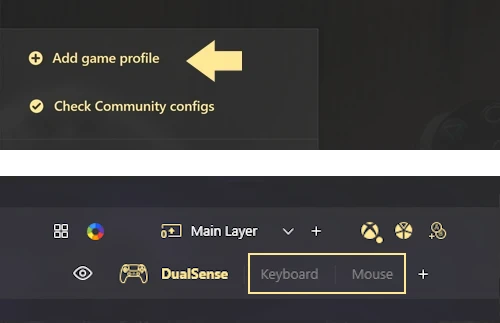
If you wish to create a config from scratch, add a new Game Profile, and assign all the needed mappings in Keyboard and Mouse sub-configs:
![]()
-
Change the virtual controller type in the Virtual controller settings:
![]()
- When remapping Mouse moves to Virtual Stick, we suggest you Mute the native mouse input, and avoid double-input in games. Find out how to bring native mouse behavior back from the Working with a muted mouse article.
- To customize the way Virtual stick works, make sure to check out the video guide.
I want to use several different devices at the same time, and only have one output visible for games
-
If you see at least one device with a [?] in the Device panel, you should start with Device initialization. Choose the device with [?], then you will see a screen like this:
![First Launch]()
-
To properly define which device this is, click Device Detection icon:
![First Launch]()
-
With Detection mode on, reWASD will light up the device you are pressing your buttons on. Now press the buttons on keyboard, if the chosen device lights up — choose Gaming keyboard or Keyboard with touchpad option. If you press mouse buttons, and the active device lights up — choose Mouse with programmable buttons option.
-
Click Submit, and repeat initialization until both keyboard and/or mouse you want to use in-game are initialized
-
Once you’re done, Group the devices you want to use: choose either one of them, click on Group button below the image of the device:
![First Launch]()
-
Now choose up to 3 more devices from the drop-down list to create a Group. Press Save icon to proceed further:
![First Launch]()
All the devices in one group will represent one Virtual controller, so any mappings you add further will be executed on its behalf. To execute Virtual keyboard and mouse mappings on behalf of your physical keyboard and mouse, visit Preferences — Input Devices.
-
Since this group is custom, most likely you will need to create config from scratch. Doesn’t hurt trying your luck in the Community though.
-
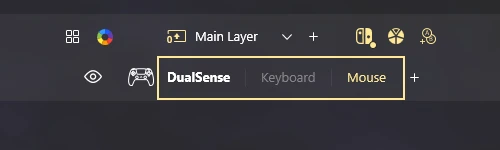
Create a new Game Profile, then make sure you have enough sub-configs for all the devices in the group. Pay attention to the panel on the top of the screen:
![]()
-
Gamepad, Keyboard and Mouse are the basic sub-configs and they cannot be removed. To add more sub-configs, click the + sign and choose the type of the sub-config:
![]()
-
If you have two or more devices of the same type (gamepads, keyboards, or mice) and apply one sub-config, it will affect every device in the group. You can preview how your sub-config will affect the behavior of every device by selecting the device icon.
Split sub-config to create different sub-configs that may affect devices in a group in different ways. All sub-configs will be applied to the devices based on their order in the group and will inherit the device's name. You can also choose the preferred sub-config and merge all sub-configurations from the same type of device into the selected one.
![]()
This same principle applies to keyboards and mice.
-
Once all the mappings are added, Apply the config and have fun!
