Remapping keyboard
Remapping a standard keyboard
If you have a standard keyboard without additional buttons or touchpad, follow these steps to remap it:
- Download and install reWASD
- Launch reWASD and make sure that your keyboard is connected to the PC
- Check the lower left corner, choose the keyboard (or a group of devices that includes keyboard) you want to remap on the Device panel
- Create a new profile by clicking the Plus sign at the bottom of the Profile list: set the name of a game, add a background picture if needed, and click Add. The config is created automatically
- Pick Keyboard in the menu on the top of reWASD window
- Press Add button to add the new element to the table
- Add some mappings: choose the key you want to remap on the left, and then add a mapping to it on the right. Repeat until you add all the desired mappings
- Once you’re done, press Save if you want to keep the changes, or press Apply if you want to try the config right away. When you press Apply the config is saved automatically
- Once the config becomes active, you will see Remap is ON in the bottom left corner. To eliminate the active config, press Remap is ON button, and you will see the Remap is OFF indicator. Press it once again to switch remap back ON.
Please note, that reWASD forbids to mute the following buttons: Right Alt, Right Ctrl, Delete, End, and Enter on the main keyboard. Please consider other keys to remap.
Remapping a gaming keyboard (with additional programmable buttons)
If you have a gaming keyboard with additional programmable buttons or a keyboard with touchpad, it may be reported to reWASD as an unknown device. To initialize and use the keyboard, you need to do the following:
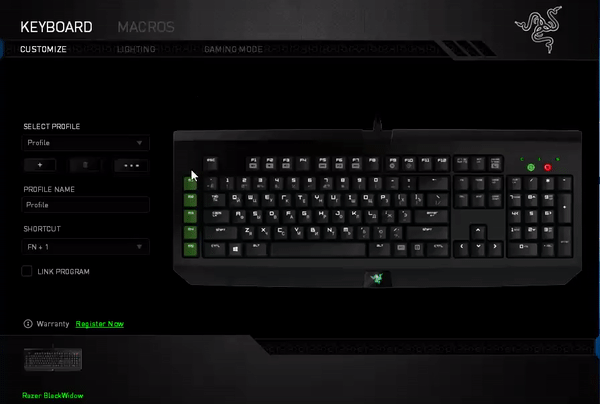
- Download, install reWASD, and also install the native software for your particular keyboard (I have an example with Razer BlackWidow and Synapse 2 software)
-
Now open the button mapping section in the native software of your keyboard. You need to assign the additional buttons to some buttons, that are not related to the basic keyboard buttons. As an example, I will map M1 to Left mouse button, M2 to Right mouse button, M3 to Scroll click (which is Middle mouse button click), M4 to Mouse Button 4 and M5 to Mouse button 5:
![Remapping keyboard]()
Note, that if you assign, let's say, Q to M1 in the native software, and map something to Q in reWASD, both M1 and Q on your keyboard will reproduce the way you set in reWASD. That's why it's important to map the buttons that do not exist on your physical keyboard to additional buttons, to save the native layout.
-
Launch reWASD and make sure that your keyboard is connected to PC
-
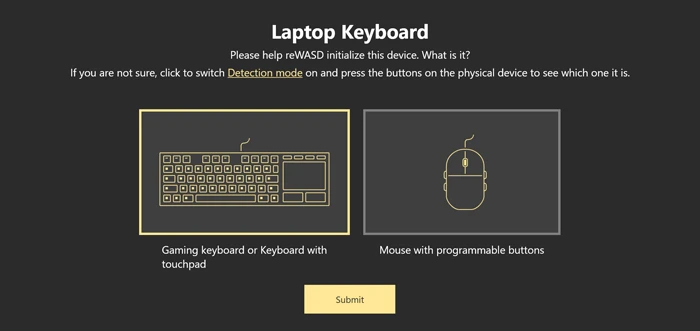
Check the lower left corner, find the icon with a question mark and click on it. You will see the following window:
![Remapping keyboard]()
-
Pick the relevant option, and press Submit. Now you can add mappings to it
Keep in mind, that if remap does not work properly, there is a chance that the keyboard was not initialized properly. You can start from scratch and re-initialize it: open Preferences — General, and click Clear data. Then, make sure to use Detection mode to make a right choice.
-
Choose the keyboard (or a group of devices that includes keyboard) you want to remap on the Device panel
- Create a new profile by clicking the Plus sign at the bottom of the Profile list: set the name of a game, add a background picture if needed, and click Add. The config is created automatically
- Pick Keyboard in the menu on the top of reWASD window
- Press Add button to add the new element to the table
-
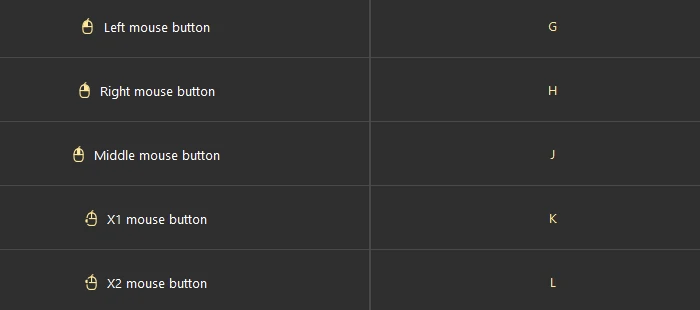
Now you need to assign the keys from the native software to the desired actions. Don't forget to Mute the additional buttons too, to prevent unwanted actions. I will map LMB to G, RMB to H, MMB to J, X1 (which corresponds Mouse Button 4) to K, and X2 (which corresponds Mouse Button 5) to L:
![Remapping keyboard]()
-
Add some mappings: choose the key you want to remap on the left, and then add a mapping to it on the right. Repeat until you add all the desired mappings
-
Once you’re done, press Save if you want to keep the changes, or press Apply if you want to try the config right away. When you press Apply the config is saved automatically
- Once the config becomes active, you will see Remap is ON in the bottom left corner. To eliminate the active config, press Remap is ON button, and you will see the Remap is OFF indicator. Press it once again to switch remap back ON.