Remapping gyroscope
Please note, that many controllers with Gyroscope automatically re-calibrate every time you connect them to PC. So before you connect your controller, make sure it is not rotating or moving, just lying still for a few seconds after you connect it to PC.
Since reWASD 5.6.1, you can add Virtual DS4 Gyroscope mappings to any controller that has gyroscope physically. If you use the Magic wand to assign Virtual DS4 controller, right now Gyro mappings will be added to it as well. If you want to add every Virtual DS4 mapping except gyroscope, you will need to pick Gyro icon and choose Mute. Make sure to do that if you wish to add other mappings to the gyroscope
Since reWASD 5.8, you can use Flick Stick feature along with Gyro aiming.
Starting with reWASD 6.0, you can choose the Gyro initial state in Preferences — Gamepads.
Important note: if you have created a group of several controllers that have gyroscope, and applied the config with virtual Gyro mappings, only the first controller in the group will have a Virtual Gyro assigned to it, no matter how many sub-configs you have.
Gyro movements
Gyro is not about how you move your controller but about how you rotate it. While using Gyro, you can rotate your gamepad along three axes. They have unique names inherited from airplane axes: roll, yaw and pitch. Note that those axes are moving together with the controller so depending on how you hold it in hand, the movements may seem a bit different.
Roll axis
If you want to look around, by default, you will need a roll axis. Here is how the gamepad should be moved:
Please note that if you are lying down and the gamepad's “nose” is pointed up, you need to move the gamepad the same way (pushing the right hand forward and dragging the left hand to yourself, you will look right):
Pitch axis
If you want to look up or down, use pitch axis. You need to lift the gamepad’s “nose” up or lower it down:

The same movement should be done if the controller’s “nose” “looks” up. But in this case, you need to move the “nose” to or away from you:

Yaw axis
When the gamepad is lying on the table, the movement along the third axis — yaw — looks like spinning:

If the gamepad’s “nose” is pointed up, the movement is similar to steering:
By default in reWASD, in Gyro mode, yaw stands for Lean mappings, while the roll is used to look around. However, you can swap the axes using the correspondent command — Switch gyro steering axis, or pick the default steering axis (whether Yaw or Roll) in Preferences — General. In Tilt mode, the roll is used as a steering axis when the gamepad’s “nose” looks forward, and yaw is used as a steering axis when the gamepad’s ”nose” looks up.
How to adjust gyro mappings
reWASD allows you to set mappings to gyro starting from 5.3.0 version. The functionality is available for DualShock 4, Nintendo Switch Pro, Joy-Cons and several Nintendo clones that have a gyroscope physically. To adjust mappings, follow the steps below:
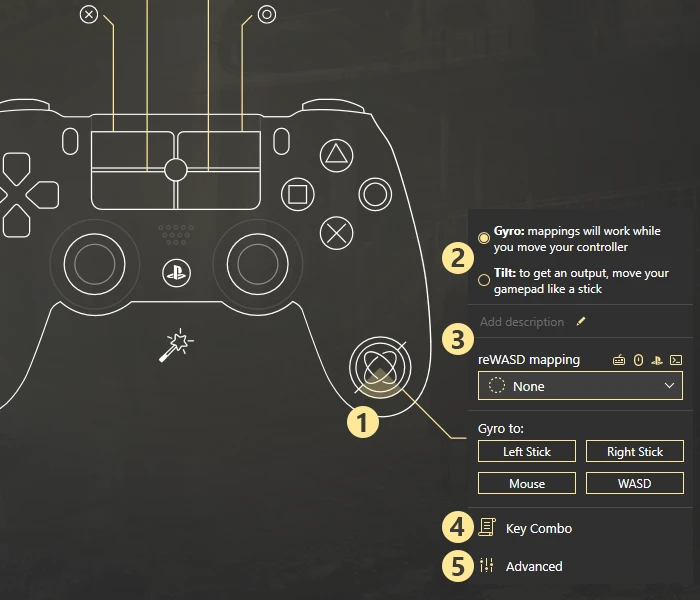
- Click on any direction of Gyro symbol
- Set the preferred mode: Gyro or Tilt. In Gyro mode, mappings stop when you stop moving your controller. This one is better for camera movement, however, it may depend on your personal preferences and the game type. In Tilt mode, the whole controller turns into a big “stick”, so to get the max output, you need to move the controller to the right angle, and to get back to the deadzone, you need to return it to the steady state. This mode is perfect for racing games
- Choose reWASD mapping for a single direction or use group mappings to simplify this process
- Otherwise, you can add a Key Combo to the chosen direction
- Go to Advanced settings to adjust additional parameters
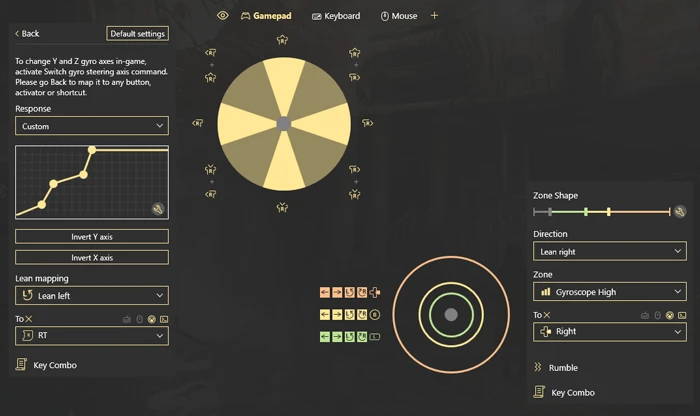
Advanced settings for gyroscope vary from the mode.
In Advanced settings for Gyro mode, you will be able to:
-
Set Response of the gyroscope using the list of presets or a curve. The horizontal axis of a curve stands for how fast you move the controller. The vertical axis stands for the mappings. With a stick mapped to gyro, the min point is a stick’s deadzone, and the max point is the max deflection.
-
Invert Y or X axis of the gyro. By default, you need to move the gamepad's “nose” up to look up and to roll your gamepad to the right to look right. If it is not convenient for you, you can invert the certain axis. Please note that you are inverting the mappings while yaw, pitch and roll axes of gyro remain the same.
-
Set Lean left and Lean right mappings. By default, Lean is a yaw rotation. You can swap the axes using the correspondent command — Switch gyro steering axis, or pick the default steering axis (whether Yaw or Roll) in Preferences — General. Here you can map any keyboard, mouse, gamepad control, add a combo or a command.
-
Change Zone Shape. In Gyro mode, the zone depends on how fast you rotate the gamepad. The grey zone — deadzone — stands for the slowest movements that won’t be registered by reWASD. Please note that it is better to minimize the deadzone for Gyro mode, otherwise, you will need to push your controller pretty strong to get the output.
Starting with reWASD 5.3, we have added an option to see the value on the Zone sliders. To see the value, please put the cursor on the slider. This will help to tune the settings even more precisely. Starting with reWASD 5.5, you can enter the values manually with the Precise adjustment fields.
-
Also, you can change Green (low), Yellow (medium) and Red (high) zones shapes. It is a good idea to use the High zone for some rare mapping in case if you do not map anything to Gyro directions on the first step. This way, you will be able to emulate some combo when you rotate your controller along any axis quickly.
-
Since reWASD 5.5, we have added an option to add mappings to Gyroscope zones for different directions. Choose the needed Direction (All, Left, Right, Up, Down, Lean left, Lean right options are available), then pick the Zone and add a mapping, combo or rumble To it.
After you are done, click Back on the top of the left list of settings to return to the main view. Click Default settings to reset the gyro to the default state.
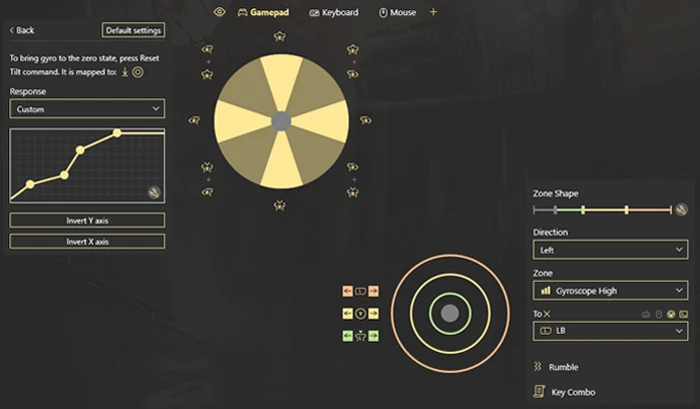
In Advanced settings for Tilt mode, you will be able to:
-
Set Response of the gyroscope using the list of presets or a curve. The horizontal axis of a curve stands for the physical movement of the controller. The starting point is a zero-angle rotation. The max point is the right angle — 90 degrees. The vertical axis stands for the mappings. If you have a stick mapped to gyro, the min point is a stick’s deadzone, and the max point is the max deflection. The default curve allows you to get the max deflection while you rotate your gamepad to approximately 30 degrees.
-
Invert Y or X axis of the gyro. By default, you need to move the gamepad's “nose” up to look up and to roll your gamepad to the right to look right. If it is not convenient for you, you can invert the certain axes. Please note that you are inverting the mappings while yaw, pitch and roll axes of gyro remain the same.
-
Change Zone Shape. In Tilt mode, the zone depends on how far you rotate the gamepad. The grey zone — deadzone — stands for movements that won’t be registered by reWASD. Minimize the deadzone if you need to get output while you slightly rotate the controller, and make it bigger if you feel uncomfortable while trying to set the gyroscope to the steady position.
Starting with reWASD 5.3, we have added an option to see the value on the Zone sliders. To see the value, please put the cursor on the slider. This will help to tune the settings even more precisely. Starting with reWASD 5.5, you can enter the values manually with the Precise adjustment fields.
-
Also, you can change Green (low), Yellow (medium) and Red (high) zones shape.
-
Since reWASD 5.5, we have added an option to add mappings to Gyroscope zones for different directions. Choose the needed Direction (All, Left, Right, Up, Down options are available), then pick the Zone and add a mapping, combo or rumble To it.
After you are done, click Back on the top of the left list of settings to return to the main view. Click Default settings to reset the gyro to the default state.
Gyro-related commands
Using three embedded commands, you can control the gyroscope in-game. Before you start, map the required command to any controller’s button, activator or shortcut.
Please note that commands affect only the device that activated it, so if there are several gamepads grouped, each one needs separate commands.
Switch gyro steering axis
This command is used to swap yaw and roll in Gyro mode. Note that to look around, reWASD uses roll axes as a default one. It is convenient when the gamepad’s “nose” looks forward while you are sitting with a gamepad. For those who play lying, yaw would be a better choice. You will need to activate the Switch gyro steering axis each time you apply your config. Also, you may need this command if you change your position while playing.
The axis that is “free” of steering, is used for Lean mappings. You can set them in Advanced settings of Gyro mode.
As for the Switch gyro steering axis command is not used frequently, we recommend mapping it to a Shortcut or Triple Press activator.
Reset Tilt
This command brings a “stick” to the steady position in Tilt mode. We advise you to use it each time you start playing. Sit to the comfortable position, hold the controller as natural as possible, then activate Reset Tilt, so reWASD will know that this is a zero position. When you finish your game, put the controller on the table and press the Reset Tilt activator again, so we stop emulating mappings.
Also, you may need Reset Tilt if you can’t return the gyro to the dead zone. However, in this case, consider making a bigger deadzone in Advanced settings of the Tilt mode.
Toggle Gyro On/Off
This command may be used for both modes. While you press its activator for the first time, all gyro mappings stop. While you press it the second time, the mappings work as normal. In Tilt mode, the gyroscope will be reset to the zero position each time you switch Gyro on using this command.
You can also press and hold the button to switch gyro off. In this case, you need to map this command twice to both Start and Release activators.
Turn Gyro On and Turn Gyro Off
These commands can be used for any modes, and allow you to change the state of gyroscope mappings.
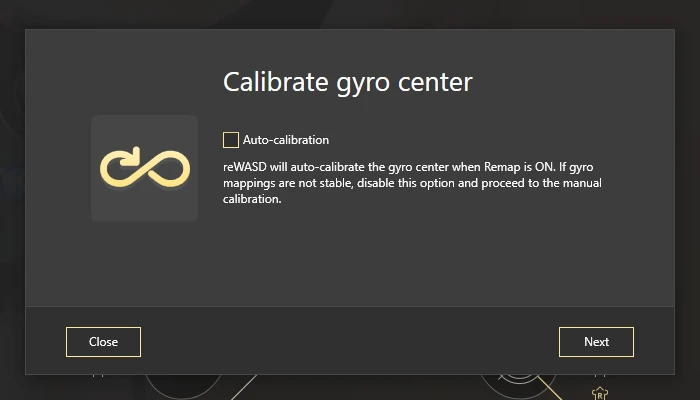
Calibrate gyroscope
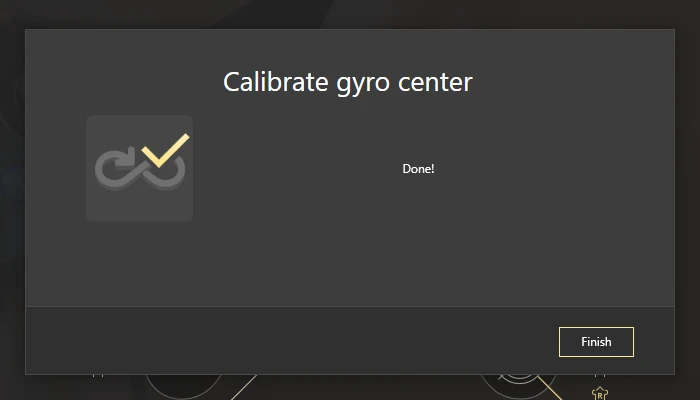
Since reWASD 5.6, you can calibrate the gyroscope on your controller. To start the calibration, connect your controller that has gyro, choose it in reWASD devices list (lower-left corner), right-click the highlighted icon and choose Calibrate:
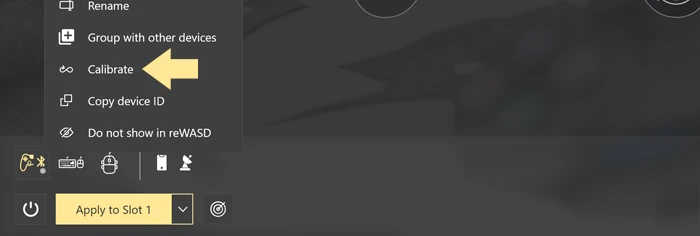
reWASD automatically calibrates your gyro, but if you feel that gyro mappings are not stable, you can calibrate the gyroscope manually. To do so, unclick Auto-calibration, and press Next:
Place your gamepad steady in any position, the most important thing is not to rotate or move the controller while reWASD is calibrating it. Click Next when ready to calibrate:
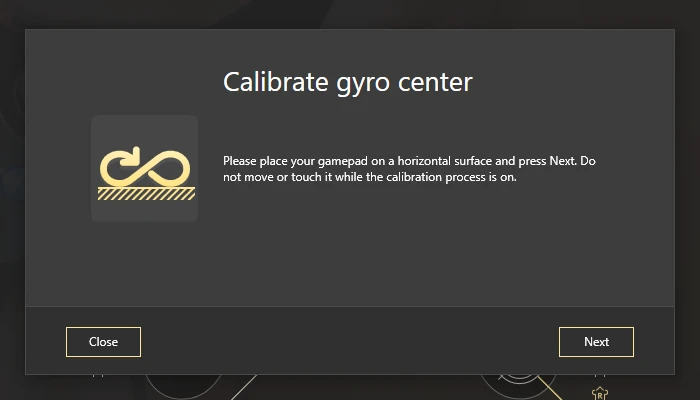
Wait a few moments until the calibration is over: