Overlay
This tab helps you manage the Desktop Overlay.
Desktop Overlay permits you check reWASD notifications (when the state of remap changes), test the virtual gamepad and use hotkey to show mappings during the game.
At this stage of development, Desktop Overlay works flawlessly with any game or program in Windowed mode.
Since reWASD 6.0, you can check Overlay in full-screen DirectX 11 games. To learn more about the available settings, proceed to DirectX Overlay segment.
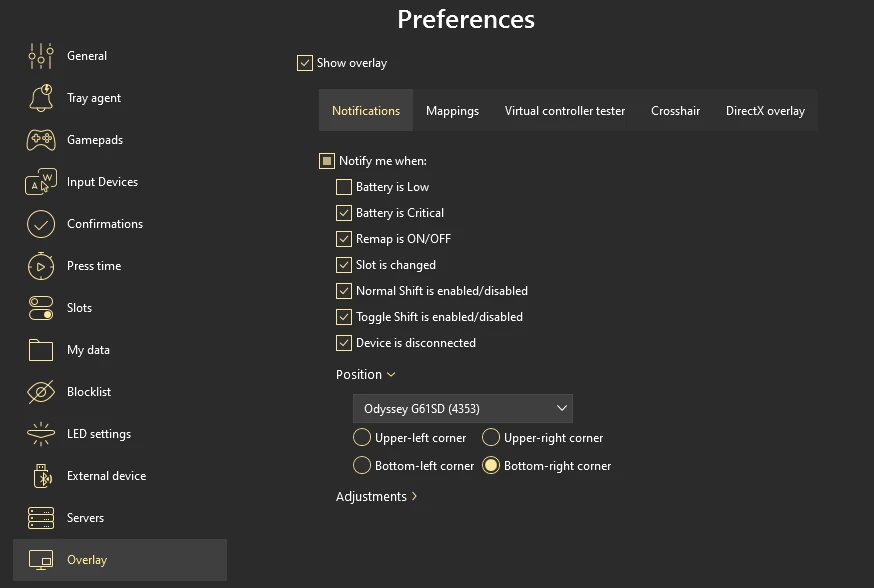
Here are the settings you can configure in Preferences for the Desktop Overlay:
Show desktop overlay — enable or disable the overlay functionality
Three tabs of settings are available: Notifications, Mappings, Virtual controller tester, DirectX Overlay.
Notifications
This tab permits you to manage how exactly the Desktop Overlay should notify you, and on what cause:
Notify me when — disable this option if you don't want to receive any notifications. Leave it enabled if you want to receive any of the following notifications, and choose which ones you want to see:
- Battery is Low
- Battery is Critical
- Remap is ON/OFF
- Slot is changed
- Normal Shift is enabled/disabled
- Toggle Shift is enabled/disabled
- Device is disconnected
Position
Here you can choose the placement of the upcoming notifications: if you have more than one monitor, choose the needed one in a Monitor drop-down list. Then pick where exactly on the chosen monitor the notifications will appear:
- Upper-left corner
- Upper-right corner
- Bottom-left corner
- Bottom-right corner
Adjustments
Here you can tune notification properties:
- Hide notifications after — tune this slider to set up how long would you like to see the notification on your screen
- Do not hide notifications about Shift — enable this option if you want to see the notification about an active Shift layer as long as it is active
- Opacity — tune this slider to manage the darkness of the notifications
- Size — define how big or small the notification tile should be
- Minimized notifications — enable this option is you wish to see a more minimalistic version of the notifications
Mappings
This tab permits you to customize the way your mappings appear in the Desktop Overlay.
Show mappings/Descriptions — disable this option if you don't want to see the list of applied mappings. Leave it enabled to have instant access to the list of mappings when the config is applied
Mappings: Enable/disable overlay with a hotkey for — choose the device you want to customize the Mappings hotkey for
Descriptions: Enable/disable overlay with a hotkey for — choose the device you want to customize the Descriptions hotkey for
In order to remove device from list, press the X on the right side of the device list.This will reset the Mappings/Descriptions hotkey settings to default, and delete the selected device from this menu. You can get the device back on this list by reconnecting in to your PC
Position
Here you can choose the placement of the upcoming notifications: if you have more than one monitor, choose the needed one in a Monitor drop-down list. Then pick where exactly on the chosen monitor the notifications will appear:
- Upper-left corner
- Upper-right corner
- Bottom-left corner
- Bottom-right corner
Adjustments
Here you can tune notification properties:
- Opacity — tune this slider to manage the darkness of the Mappings overlay
- Size — define how big or small the mappings tile should be
Virtual controller tester
This tab permits you to tune the settings of a Virtual controller tester in the Desktop Overlay.
Show virtual controller tester — disable this option if you don't want to use the tester in the Overlay. Leave it enabled to have instant access to the Virtual controller tester when remap is on
Show controller only — disabled by default, this option reveals numerical values for analog controls, and digital button presses, along with the image of a controller that also displays button presses. Enable this option to see the gamepad image only
Autohide after 5 seconds of inactivity — activate this option to automatically hide the tester if you don't press any buttons for 5 seconds
Enable/disable overlay with a hotkey for — choose the device you want to customize the Tester hotkey for
Remove device from list — use this option to reset the Tester hotkey settings to default, and delete the selected device from this menu. You can get the device back on this list by reconnecting in to your PC
Position
Here you can choose the placement of the upcoming notifications: if you have more than one monitor, choose the needed one in a Monitor drop-down list. Then pick where exactly on the chosen monitor the notifications will appear:
- Upper-left corner
- Upper-right corner
- Bottom-left corner
- Bottom-right corner
Adjustments
Here you can tune notification properties:
- Opacity — tune this slider to manage the darkness of the Tester overlay
-
Polling rate — modify this slider to change how often the Tester overlay refreshes and displays the input from the Virtual controller
Please note that the lower value (faster rate) leads to the higher CPU usage.
Size — define how big or small the tester tile should be
Crosshair Overlay
- You can enable or disable the crosshair overlay with a hotkey for each specific device.This option allows you to set up a hotkey for enabling Custom Crosshair for different devices.
We suggest to use a combination of hotkeys to avoid mapping conflicts.
- Choose a monitor to display the Custom Crosshair overlay.
DirectX Overlay
It is important to understand, that this type of overlay lets us try to inject to DirectX 11 app to show Notifications, Virtual controller tester or Mappings depending on the settings adjusted on other tabs. Please note that injecting may be prohibited by the game itself, so use wisely.
Show DirectX 11 overlay for the following list of apps — enable this option to use DirectX Overlay
Use Add *.exe file or Add active process option to fulfill the list of applications where you would like to use DirectX Overlay
Don’t forget to press Apply to save the changes. Press Back to return to the main interface